Heading into my senior year in college, my mom and I realized that I was going to most likely be moving not just across town but out of town after graduation and my wedding the next summer, ending the days of having just a short trip on the freeway between us. I’d been getting more and more interested in cooking since the trip we took together to Turkey two years before that, and we both wanted to learn to decorate cakes, so we ended up enrolling in the beginning Wilton classes. And so I started down the path toward pastry school, elbow-deep in Crisco-based frosting in the back room of the local gigantic craft store.
 I’m not entirely sure what prompted it, but that Christmas I became obsessed with making fancy little candies for everyone’s presents. Most of them are not so fancy in retrospect, utilizing grocery store coating chocolate and far too much sugar, but then and now the crown jewel of it all was the chocolate-covered cherry. I actually used real chocolate to coat those. I didn’t know anything about tempering chocolate then, so they were soon covered in blooming cocoa butter (not that I even knew that was the problem), but they still tasted delicious. Ever year since, I’ve intended to make them again–and make them right this time, with tempered chocolate and invertase (the enzyme used in commercial cherries to make the centers liquefy)–but even when I’ve acquired the required cherries, they haven’t gotten made.
This year, things were going to be different. This year I lined up a cherry-candying buddy, sort of like a workout buddy but more fattening. Geeky Gnu and I made plans to get together and make them as soon as the invertase showed up. We had to wait a bit longer than we liked on account of the fact that Chef Rubber was waiting for the invertase to be made, but it finally showed up on Tuesday. I was feeling lazy earlier in the week, but fortunately I was talked into making the cherries on Wednesday night rather than Thursday night, which was good because the difference between the two was seven inches of snow.
Part of doing things right this time was finding a recipe that called specifically for the invertase, rather than just adding a few drops of the stuff to the one from Woman’s Day I’d gotten off of the internet all those years ago. I found some hopeful-looking info by searching eGullet, but as of Wednesday afternoon I still didn’t have a recipe in hand. I was wandering through Barnes and Noble, picking up a couple of presents I’d waited too long to order off of Amazon, when what to my wondering eyes should appear but the book I’ve been looking for all my life, standing there on B&N’s prominent cookbook display: Chocolates and Confections: Formula, Theory, and Technique for the Artisan Confectioner.
It had a recipe for fondant–the confectioner’s sort, not the kind you peel off of wedding cakes before eating them. It had a full explanation of invertase and how to use it. It had all sorts of technical information about chocolate and sugar I didn’t have memorized yet.
It came home with me. I couldn’t resist.
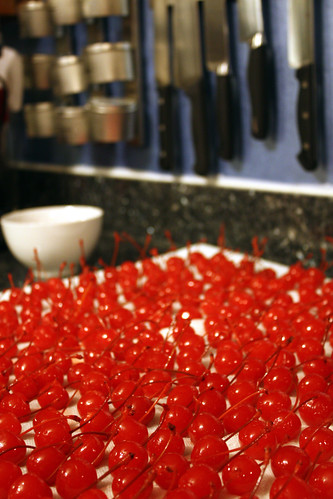
 After a quick perusal of the pertinent pages, I drained the cherries, reserving the juice, and set about lining them up to dry on cooling racks padded with a double layer of paper towel to absorb the juice. A lot of recipes recommend doing this the night before, but we had to be somewhat flexible dependent on the weather.
A couple quick facts for calculating recipe size:
– Average number of cherries per 36 oz. jar (Star brand, from a two-pack bought at Costco): 73.25
– Average number of wasted cherries per a jar due to missing stems: 6
Once Geeky showed up, we started in on a half batch of the fondant recipe in my beautiful shiny new book. The general idea is to take five parts sugar, one part glucose syrup, and one part water and bring them to a boil while stirring constantly. Since I was approaching this whole fondant thing with a teensy-weensy bit too much confidence, I figured I’d go right ahead and substitute the cherry juice for the water in the recipe without bothering to do any boring math to keep the ratio of sugar and water in line. Whether or not this contributed to some of our later troubles, I can’t say. I can say with certainty that it turned the fondant a fairy-tale shade of pink that made the dipped cherries look like a smooth, shimmery bonbon out of a computer-generated cartoon. There’s a certain magic to dipping these cherries that makes you not care about the evils of artificial redness.
Once the syrup is boiling, we quit stirring (okay, maybe there was a little forgetfulness in play here and it took awhile before we figured out we were supposed to stop) and cooked the syrup to 243° F (it may have gotten a little higher than that before we got it out of the pot).
 Next, we poured it out onto my woefully small marble slab. The directions say to sprinkle cold water on the marble first and then also on top of the sugar; we managed to sprinkle it on top of the sugar, which started spilling toward the edge of the too-small marble due to the fact that I set it down on the one part of our counter that our discount granite guys didn’t install anywhere near level.
The action didn’t stop once we had that under control. We let the sugar cool to 120° F, more or less, and then began the process of agitating it into crystallizing by scraping it back and forth on the marble, much like one would do with chocolate only much, much more of a pain since chocolate flows and sugar sticks and holds on like the marble is the last life preserver on the Titanic. This required a lot more strength than I was anticipating, so I mostly tried to hold the marble in place and scrape the sugar off the main scraper with a metal bench scraper.
The book says this step should take twenty (very long) minutes for the fondant to fully crystallize, “turning into a short-textured mass.” Twenty minutes came and went without the fondant changing from its consistency of a very gooey, sticky cousin of pulled sugar, even as it became tougher and tougher to scrape.
Finally, we resorted to scraping it entirely off the marble and pulling it like it actually was pulled sugar. This helped…to a point. We never got that short-textured mass, but after awhile it did take on more of a…well, I wouldn’t say it got any less shiny, but the inside of the mass looked more and more matte somehow, and thus seemed to be fairly well crystallized.
 The next step in the directions is to allow the fondant to rest overnight, but we didn’t have overnight, so we went straight to dipping the cherries.
To coat the cherries, we heated the fondant over a water bath to 160° F, thinned it a little with some more of the cherry juice (the recipe suggests brandy), and added 1/4 tsp of invertase just before dipping.
Once all of that was accomplished, the dipping went very easily. Keeping the bowl over the water bath (with the gas turned down to the lowest setting) kept the fondant thin enough to coat the cherries without too much trouble. As each one was coated, we let them drip over the bowl, removed the extra fondant hanging from the bottom with the edge of a wooden spoon, and set them to cool on a sheet pan covered with a Silpat.
 I don’t think anyone who was there could get over how pretty they looked. I really wanted to leave them like that…only the invertase would have left all of that shiny pink sugar in a puddle around the cherry after a day or two. We did give into temptation and try a couple of misshapen and stemless cherries that way, though, and as pretty as the pink ones are, they’re much better with the chocolate. So that makes up for having to cover up the sugar coating.
One thing we didn’t learn until later was that it’s better not to let the fondant coat the stem as well as the cherry. Coating the stem gives the invertase-laced fondant an express lane to the open air, along which it can ooze out and drip all over the chocolate.
 Because we only made a half batch of the fondant–enough for about a quarter of the cherries I had drained and dried for us–I made some of the home-style “fondant” I had used the first time I made the cherries and had a couple of helpers cover them with me while Geeky dipped the other cherries in the real fondant. The recipe itself is very straightforward and my only addition to it was 1/2 tsp of invertase, so I won’t get into detail on that, but I have a tip or two about how to get it onto the cherries in a smooth and even fashion.
The main trick is to dust your hands/latex gloves with enough powdered sugar that the “fondant” remains dry as you roll. Also, using a smaller piece than you think you need to cover the cherry and squishing it to fit helps avoid making big, clunky-looking cherries. Once you have the cherry covered, put it between your hands with the stem sticking out between the middle and index fingers of your dominant hand. Roll the cherry very quickly and very lightly, around and around. This should make the top and bottom of the cherry smooth, but make the middle stick out, so turn the cherry so the stem pokes out toward you (between your thumbs) and roll it again, still quickly and lightly. Finally, roll it around sort of every which way in your palms to smooth it all over, once again quickly and lightly.
I emphasize the quickly and lightly part because the less pressure you put on the cherry, the rounder and nicer it will look. All of that should take 30 seconds at the most–the quicker you do it, the lighter your touch is likely to be. Hopefully.

The next step is, of course, actually dipping the cherries in chocolate, which will be the subject of the next (hopefully shorter) post. But see what I mean about cartoon bonbons? I love that pink fondant.

 Stumble Upon
  Del.icio.us
  Buzz
Buzz
Great post! I made these one year when my kids were little for gifts at Christmas…what a project, so kudos to you…and I love them!
My best experience is to dip “most” of the cherry in the fondant, leaving a small area between the top of the fondant and the stem. After letting them set and dry a bit, I then dip them in the tempered chocolate all the way up the to the stem, even onto the stem. Having a pre-made chocolate “pedestal” to set the chocolate dipped cherries reduces the likelihood of having the cherry settle to the bottom of the chocolate which lets the fondant escape the thinned coating of chocolate.