Chris: I’ve been brewing hard cider for many years, but have switched to other brews in recent years because I haven’t been able to find any good unfiltered juice for the $4/gallon that it used to go for during the fall. However, I have been long intrigued by the thought of starting the brewing process earlier by pressing my own juice, and so I decided to try to beat the market by pooling resources with some friends, buying about 1/3 ton of apples, and hosting what I ended up calling an old fashioned apple pressing party and potluck. We had a great time and learned a lot about apples and apple presses, especially the part about why good apple juice no longer costs $4/gallon.
So I went about collecting juice orders from about 10 friends, and tried my best to guess at how many apples would be required to hit the 40-45 gallons that we all wanted. Based on a number that turned out to be way off base, that came to 630 pounds. After factoring in the cost of renting a cider press and crusher from a local brewing supply store, I guessed that it would cost somewhere around $8 per gallon, which sounded pretty reasonable compared to the $12-15 that organic unfiltered apple juice can cost in the store, especially if I could also pick the kinds of apples that were going into the juice (Honeycrisp are Jessica’s favorite). Too bad my information and my math were wrong.
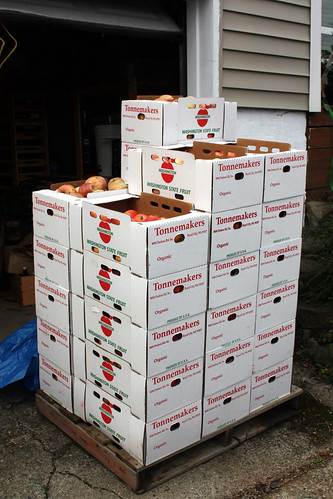
Finding apples was easy. I went to our local weekly farmers market and talked to the people at Tonnemaker Family Orchards. Kurt Tonnemaker was happy to deliver 30 boxes full of Honeycrisp, Cameo, and Gala apple “seconds” for $0.50/lb (the boxes were an extremely welcome surprise — I initially thought I’d end up with a huge bin of apples at the bottom of my steep driveway).
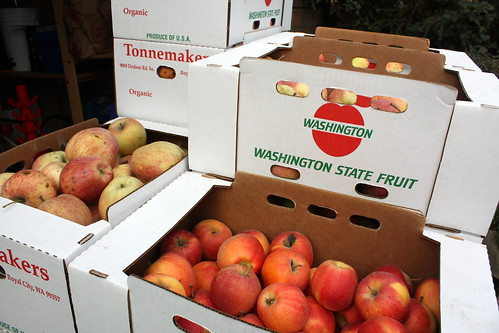
For those who don’t know, apple seconds are the older and uglier apples — not good enough to sell at full retail price for eating but still full of delicious juice. I’d like to add that I love knowing the name of the people who grow the food I eat — the Tonnemaker family all seem to love what they do, which I think makes their produce taste even better.

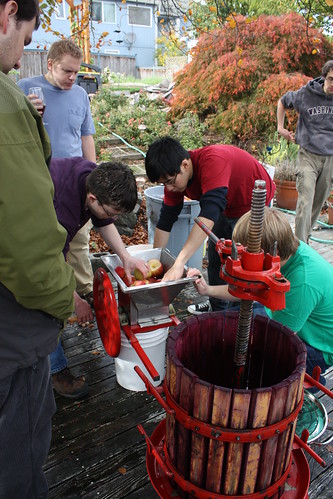
A friend picked up the press, which as you can see is stained quite purple from other people using it for grapes. It also smelled like stale beer. If you ever go about renting a cider press, make sure you pack a tarp to protect your car’s interior.
We also picked up a couple of pressing bags. These are basically nylon mesh bags designed to handle the pressure of the press. The idea is that you can press them more before you start getting apple pulp leaking into your juice. The problem we found is that the bags are about $8 each, and don’t actually hold very much apple. With both bags full, the press wasn’t even full enough to get more than a couple of cups of juice out. The press came with spacers to allow you to press it down much further than the screw allows, but we all felt that we were missing at least one more pair of spacers to get any advantage out of the pressing bags, so we abandoned them after a single attempted use.
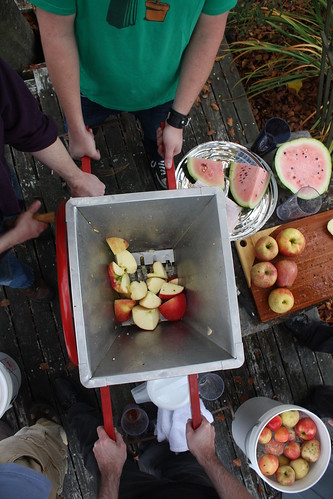
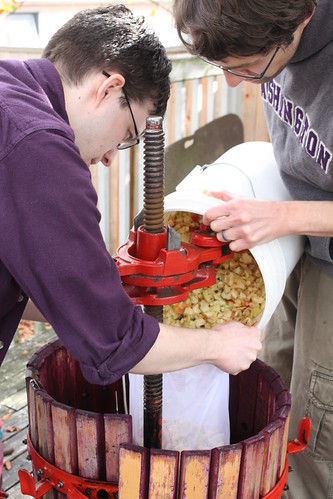
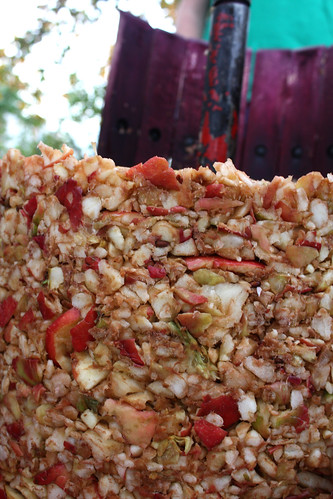
The crusher was definitely worth the rental fee, however. This is basically a device that breaks up the apples into chunks that help make the pressing easier. Our apples were quite large, which prevented the crusher’s blades from easily pulling them in, so we ended up building an assembly line to wash, rinse, and quarter the apples before dropping them into the crusher.
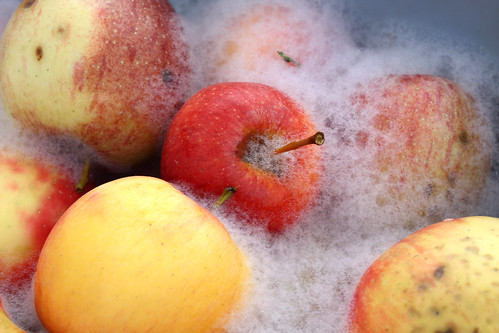
We washed the apples in a large garbage can that I keep around for yard waste (meaning that it has never been used for actual garbage), in a solution of standard “fruit and vegetable wash” from the grocery store along with an extra dose of grapefruit seed extract for good measure (which has powerful antibacterial/anti-fungal properties). Rinsing was done in some large food-safe buckets that I keep on hand for brewing. We also used these same buckets to hold the pulp produced by the crusher until we were ready to pour it into the press itself.
After a few attempts with the ratchet press that had it wandering all over my deck (trailing some nice scratch marks), we quickly realized that the forces involved were more than we could handle without actually attaching it, so I succumbed and drilled some holes for lag bolts. Along with some beeswax to grease up the screw mechanism, we were able to more than double the speed with which we could ratchet down the pressure on the apple pulp.
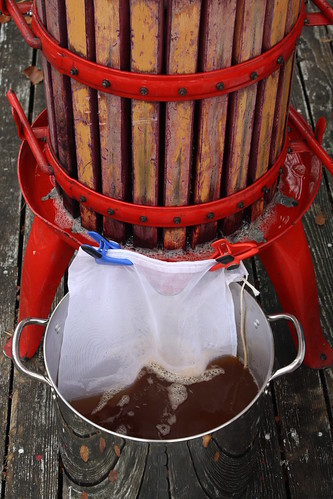
Even without the pressing bags, we didn’t have any trouble with pulp pressing out through the slats on the press, so I can’t really recommend them as an extra investment. We used one bag as a filter over the drain into our juice bucket, but you could get the same effect from some cheap cheesecloth. Definitely invest in some lag bolts and a wood surface to attach the press to, or you’ll never get enough pressure for a good amount of juice.
After about 8 hours (2-3 of which were spent just figuring things out), we managed to get 33 gallons of juice out of 630 lbs of apples. This put the total cost per gallon somewhere just under $13, which was a far cry from the $4 that I was trying to reach. The sad thing is that Whole Foods put organic cider on sale for $6/gallon one week before the pressing party. Good thing the experience of actually pressing my own apple juice was worth it.
So what did we do with the juice? Cider.
Well, as you can see from the first paragraph, one of my primary goals was to make some hard cider. The recipe from my friend Tor is about as simple as it gets for cider, but it’s also not going to taste anything like the stuff you get at the store. Turns out, I didn’t actually have enough sugar, anyway. I usually use dry champagne or ale yeast for my cider, but this time I decided to splurge and try out two different strains of liquid yeast from the brew store: one specifically for cider, and a champagne yeast (both from Wyeast Labs, which is a brand you’ll find at most brewing supply stores). Since I started brewing without checking to see that I had enough sugar on hand, and still had a bunch of honey left over from making mead, I decided to make a cyser instead (this is basically a melomel, or an apple mead). The recipe went as follows (twice, since I made a 5-gallon batch for each type of yeast):
- 8 cups of white sugar
- 3 cups of golden brown sugar
- 8.5 lbs of fireweed honey (about 11 1/3 cups)
- apple juice to fill the bucket to 5 gallons
I mixed about 1 gallon of apple juice with the sweeteners and cooked them until everything was dissolved. Then I added it to my fermenting bucket and topped it off to a little over 5 gallons, let it cool for awhile, and pitched in the yeast. That’s pretty much all you have to do for cider, and it’s currently bubbling away in my garage (ok, so there is some maintenance work to be done, but I haven’t actually done that yet and I’ll reserve that for another post dedicated specifically to brewing).
And Jelly.
Aside from drinking a bunch of the juice, we also made a batch of apple cinnamon jelly. With the arrival of our first child scheduled for early December, Jessica and I have been doing our best to prepare for Christmas gifts in advance, which includes teaching ourselves how to make jams and jellies (I’m sure she’ll have a post of her own on this topic that will be better than anything I can come up with).
Using a trick I use for clarifying homebrews like mead and cider, I clarified a bunch of the apple juice using bentonite clay. Bentonite is amazing stuff — 24 hours after mixing up a slurry and tossing it into the juice I had a gallon or so of almost completely clear apple juice, with all of the opaque solids settled to the bottom of my pitcher. Using a recipe from The Complete Book of Small Batch Preserving, Jessica and I made a double batch of gorgeous apple cinnamon jelly.
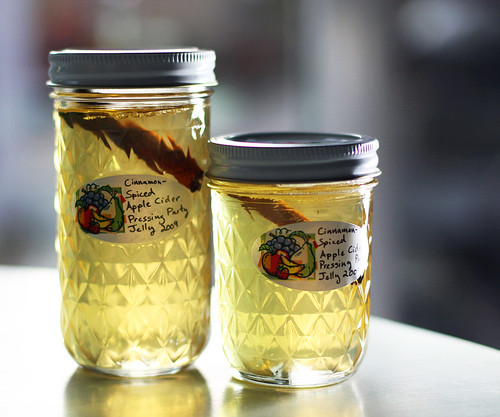
Jessica: We followed the recipe in the book fairly closely, but started with clarified cider and made a much, much larger batch. We also added more cinnamon. The book calls for one cinnamon stick to two and a half cups of unfiltered cider; we used one short cinnamon stick per a jar (a total of 11 sticks) for eight cups of filtered cider. Why? Because I wanted a stick in every jar, not just a shard of a stick in every jar! Essentially, for every 2 cups of pre-clarified cider, we added 4 cinnamon sticks and brought it to a boil in a large, covered pot. (Covering is important to prevent boiling off too much of the water content of the cider, as the original recipe has you start with more unfiltered cider, and then measure again after steeping the cinnamon and filtering the result. We measured out that second measurement from the start, so we wanted to keep it all in the pot.)
Once the cider was bubbling fiercely, we let it continue for about five more minutes and then fished out the cinnamon sticks. If you wanted to take an extra step at this point, you could strain the cider to remove any tiny flecks of cinnamon and then return it to the pot, but we were on our second variety of jelly for the evening and midnight was quickly approaching, so we just left it as is. Personally, I don’t think the little flecks of cinnamon dotted through the clear, golden jelly look bad at all, although I did strain a few largish ones out at the end.
Next, we added 3 1/2 cups of granulated sugar for every 2 cups of cider and, once again, brought it to a boil, stirring occasionally to make sure the sugar dissolved completely. As the mixture heated through, we tasted it, and we both worried that perhaps there was a little too much cinnamon in the mix. We discussed leaving the cinnamon sticks out of the jars, but neither one of us wanted to do that, so I put a stick in each jar as we waited and hoped for the best.
Once the cider was boiling again, we added a pouch of liquid pectin for every 2 cups of the original volume of cider, stirred the pot, and let it boil for one more minute. There was a whitish foamy gel on the top, and I used a very small, very fine sieve to skim it off the top. We thought it might melt into the rest of the jelly as the jars processed. It didn’t melt, just rose to the top in the jars that got some of the gloopy stuff, so in retrospect I would’ve let my inner perfectionist have free reign and gotten every last bit of the foam off the top.
After that, it was a simple matter of filling the jars with the jelly and processing them as directed in the book. (I’m new to and wary of preserving enough to let you figure out how to do that elsewhere!) From 8 cups of cider, 14 cups of sugar, 11 cinnamon sticks and 4 pouches of pectin, we filled ten 12 oz. jars and one 8 oz. jar, plus a plastic 8 oz. jelly jar for our fridge. For every 2 cups of cider, you can expect to get around four 8 oz. jars plus about a quarter of a cup or so to spare.
We tasted the jelly again at this point. Our earlier worries had been completely misplaced. Over the duration of the cooking time, the fresh apple flavor and the cinnamon had blended beautifully, and the resulting jelly tasted exactly like hot apple cider on Christmas Day. We’ve since eaten our way through most of the jar we put straight into the fridge, putting it on English muffins, pancakes, graham crackers and, in a moment of desperation on Chris’ part, a spoon. I’d like to make another batch, but this time I want to put the entire pot away in the fridge and freezer for our own quick consumption.
All in all, it was a very easy recipe, so easy that I can remember it off the top of my head days later. The instructions in The Complete Book of Small Batch Preserving are clear, and there’s a very wide range of really delicious-sounding recipes to try, all in small batches so that you don’t need bulk produce, huge equipment and a zillion jars to try them out. My only complaint is that there isn’t much explanation of why you do what they tell you to do, which makes the book incomplete on its own as a way of learning to create your own jelly recipes. Perhaps too much of my foodie education came at the feet of Alton Brown, but I need to know the science and the rules behind what I’m doing in the kitchen to really make the process my own. I’m now eying The Joy of Jams, Jellies, and Other Sweet Preserves: 200 Classic and Contemporary Recipes Showcasing the Fabulous Flavors of Fresh Fruits as the next book I’d like to get on the subject, as well as the classic Ball Blue Canning Book, so that I can learn a bit more of the “why” behind the “how.” But I still really like this book for what it is, and it’s fun to look through it and imagine what all of the creative flavor combinations might be like.

 Stumble Upon
  Del.icio.us
  Buzz
Buzz
Hey there! You’ll probably enjoy Mes Confitures by Christine Ferber. It’s one of my favorite preserving books. Even though it’s a translation, there’s a good amount of explaining of technique.
Oh, thanks! They even have it at my local library! I’ll definitely take a look.
Pressing your own cider sounds like a lot of fun. I’ve been imagining myself doing just that since I was at a cider festival in England a few weeks back – will hopefully get a chance to do it someday!
.-= Daily Spud´s last blog ..Oat Cuisine =-.
Poach some fish fillets in that juice and you have yourselves some good eats!
Cool post, reminds me of a food network challenge where they had to press their own juice and then run to then next challenge, it cannot be so easy right?
Wow I’d like to participate in one of those =)
Hey guys,
I guess I am about a year late in reading this but I was very impressed with the apple press experience. You guys should have a show. Thanks again for the apple jelly. Yum! Yum! Gloria
Thank you for having so much information. My friend and I have been pressing cider for two days and have decided to make 5gal. of hard cider. We also decided to use your recipe. Thanks again!
Jason
when making jelly we wife & I put in about a 1/4 in. of butter and a teaspoon of limon juice to keep down the foam . Thanks I enjoyed your article.
you need to grind up the apples more you probly got only 1/2 the juce and worked twice as hard as you needed to .use a garbage disposal to grind the apples baby food like .
i also use a chiper shreder by sears to do my apples up 6 .5 hp will send apple sauce into pillow case and then you squaze to in press can do 1/3 bushel at a time