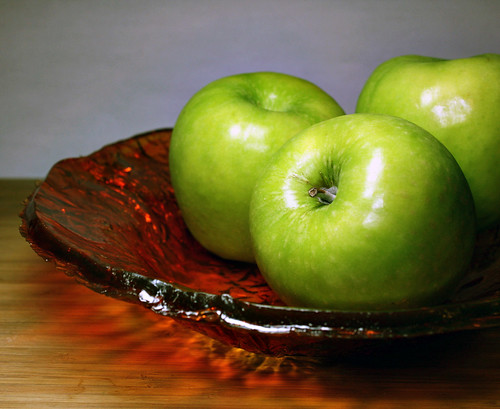
Once you start working with sugar, all the rules change. Take today’s project, for example. In the normal practice of food photography, the components of the composition fall into two categories: food and food props. If this photo were a normal food photo, the apples would be the stars, and the bowl would be the prop, albeit a colorful and flashy one. But once I point out that I made the bowl by hand, and not out of glass, but sugar, suddenly the world goes topsy turvy. The dish is the star, and the apples demoted to mere props.
It goes beyond that, though. The hours in which you play with sugar belong to another world, a sunnier, warmer place, a place where magic walks the earth and comes to cook at your side. Colors are brighter. Pots bubble and boil with a constant snap and pop, like thick, syrupy soda on some serious steroids. Things come into real, three-dimensional being, springing as much from an inner wellspring of imagination as from the hot, malleable sugar in your hands.
My goal is to make this brand of magic a little more accessible to the common foodie. To that end, I’m starting off with the easiest techniques that take the least amount of specialized, expensive equipment. The other main advantage of this approach is that I need to relearn how to do it all, so it’s probably best if we don’t all jump in the deep end together just yet. Stick with me and we’ll get to pulled sugar and blown sugar, but don’t worry: just because we’re starting with basics doesn’t mean things are going to be boring.
The first type of sugar I want to show you is Casting Sugar. Casting sugar is used mostly to make bases and supports for showpieces, but it can also be a quick way to form custom shapes. The sugar can be poured into a variety of different forms and molds, many of which you may have tucked away in your kitchen. Anything made out of silicone works wonderfully with sugar, and metal–as long as it’s well greased–does as well. I’ve used cake rings and frames, cookie cutters, silicone muffin pans and petit four molds, aluminum foil and even granulated sugar to make different shapes with different textures. Once you learn the technique, you’ll look at everything with new eyes, wondering what would happen if you poured sugar into it.
Before we begin, a reminder: boiling and melted sugar is very, very hot! Efficiency and awareness are essential to having a good sugar work experience, uninterrupted by accidents. Have a good block of time so that you aren’t rushed, and make sure to get all of your equipment and materials in order before you start and keep them in order as you work. And be careful, please!
That said, don’t be afraid of working with sugar! That’s a common but unnecessary reaction. Be cautious, but not fearful. If you’re careful, you’ll be fine. I have yet to burn myself working with sugar (knock on wood). And I’m the girl who made her lab partner turn on the Bunsen burner every day in Chemistry because she was afraid of lighting her hair on fire.
Casting Sugar
This formula is an average of several different casting sugar recipes I have in my books and notes. In general, the baker’s percentages are 100% sugar, 40 to 50% water, and 20 to 30% glucose. One book called for a great deal of tartaric acid solution to be added. We’ll discuss the use of tartaric acid in sugar at a later date, but for now I’ll just say that it doesn’t make a lot of sense to put it in casting sugar, so I went with the general consensus and left it out.
The next sugar formula I share with you will not have glucose in it, so keep an eye out for my next sugar post if you can’t get your hands on glucose any time soon. I bought mine at a local cake decorating supply shop. You can also buy small tubs of it at any craft store that sells Wilton cake decorating supplies, or you can buy better quality stuff online, which is what I plan to do in the next week or so.
Equipment
(More information about sugar work equipment)
- A kitchen scale
- A good, heavy, medium-to-large saucepan, preferably copper (I use one with a layer of copper in the bottom)
- A small, fine-meshed strainer
- A natural bristle pastry brush in a glass of warm water
- A candy thermometer, digital is better but glass also works, as long as whichever one you use is accurate
Ingredients
1 kg high quality granulated sugar
500 g cold water
250 g glucose
food coloring (powder or paste), dissolved in a very small amount water or vodka
Method

Before you begin, you want to make sure your saucepan is as clean as possible. Any impurities on the pan or in the sugar can cause sugar crystals to form–one of the two deadly enemies of sugar work, along with humidity. The best way to make sure your pan is totally clean is to scrub it with kosher salt and the juice from half of a lemon, which has the fantastic side effect of leaving you with a very shiny saucepan. Rinse very well after scrubbing.
Once your pan is spot- and speckless, combine the sugar and the cold water. Mix it together with your fingers. That way, you can feel when it’s all evenly mixed. Next, wash down any stray sugar crystals that have climbed up the side of the pan by dipping your fingers under running water and wetting down the sides of the pan. Once again, you’ll be able to feel what’s going on and be sure that you’ve gotten all of the crystals.
Start the sugar over a medium flame, and increase the heat later. Cooking sugar is tricky to do just right. I’m very out of practice, so mine isn’t turning out quite perfectly at the moment, but I’m getting better at it again already. One concern is the amount of time it takes to cook the sugar from start to finish. Too short a cooking time and you’ll end up with brittle sugar. To long a time and the sugar will melt too completely and won’t hold its shape. You want to aim for twenty minutes from start to finish, although anything from 12 to 30 minutes will work, though not ideally.

As the pan heats up, the sugar will slowly dissolve in the water, moving in shimmery, opalescent waves beneath the surface. During this time, just leave it to heat up on its own.

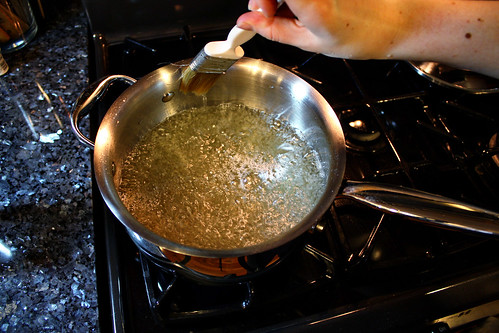
When the sugar first starts to boil, the bubbles will be small, quick, and snappy.
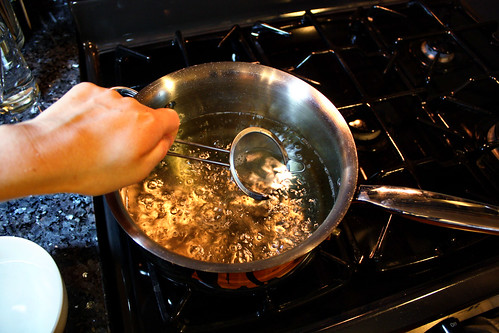
At this point, turn off the heat (or take the pan off of the heat if you don’t have a gas range) and skim any foam or impurities off of the top of the sugar. I was surprised that mine wasn’t too bad at all. A good thing, except it didn’t make for a very instructional photo.
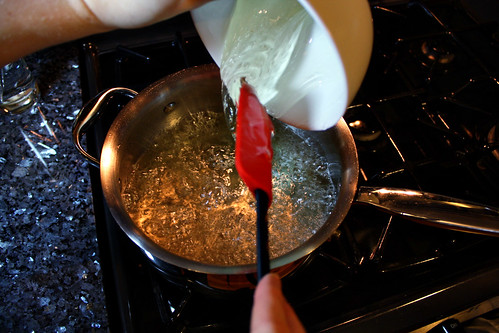
Add the glucose and turn up the heat, higher this time.
This is the point at which you have to really start worrying about crystal formation. You have two options for washing down the sides of the pan, now that’s it’s much too hot to do it with your fingers. The most common technique is to use a pastry brush dipped in water.
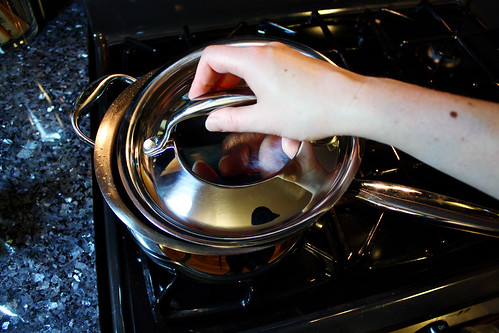
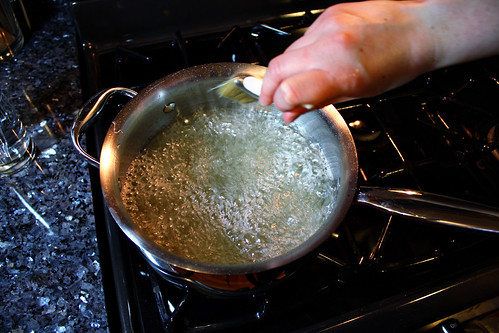
Another option is to cover the pan with a lid, but leave it cracked open so that the steam flows up the sides and washes down the crystals without your help. I read somewhere, though, that you have to be careful with this method because it can slow down the cooking process by trapping steam in and keeping the temperature from rising as soon as it normally would, so keep your eye on your cooking time.
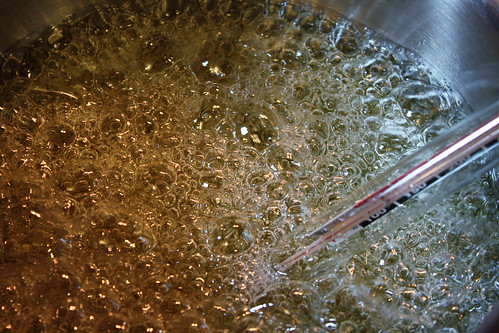
I like to do both: wipe down the pan with the brush, then cover it with the lid while I wait to hear it hit soft ball stage. One of the huge benefits of practicing sugar work on a regular basis is learning to tell what stage the sugar is at by sight and sound, a useful skill if you ever make things like caramel, chocolate mousse and Swiss meringue. Below soft ball, the tiny bubbles are fast and have that snappy popping sound I described before. At soft ball, they become increasingly slow and large, and the bubbling loses the “snappiness”. Once I hear the shift, I take the lid off and wash down the sides of the pan with the brush again.

You’ll want to start monitoring the temperature now. Our ultimate destination is 315°F, and after the slow climb to the 240°F range, the temperature will now rise much faster. This is when it’s nice to have a digital thermometer with a temperature alarm set for five degrees below your target temperature, but for some reason I don’t really mind watching boiling pots as long as it’s sugar that’s boiling in them. More important is to have an accurate thermometer, because differences of just two or three degrees can cause more trouble than you’d think.
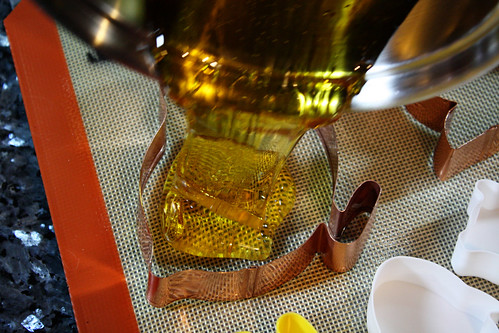
The bubbles will gradually get slower and larger, but your main gauge of where you are in the process at this point will be your thermometer. Now it’s time to think about how you want to color your sugar. If you want to make it all one color, you can add the coloring about ten or fifteen degrees before the sugar is done and shake the pan to incorporate it. Otherwise, you can add the coloring at the end if you want different shades or a marbled effect. One piece of advice that I (re)learned through experience today: if you want to divide the sugar up to make it a few different colors, don’t pour it into cold pans or containers. Mine cooled off far too quickly, which made coloring and pouring it a real pain and sabotaged some of the plans I had.
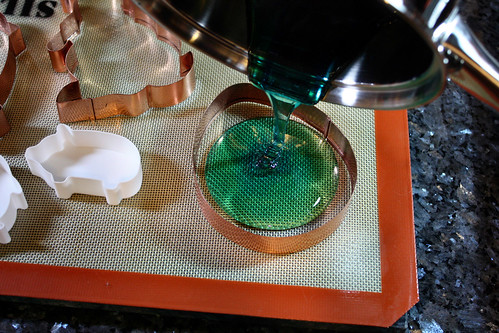
First, as a sort of warm up, I did a couple simple shapes using large copper Easter cookie cutters I’d oiled with canola oil and set down on a Silpat laid over a marble cutting board.
This chick turned out not to be the best choice. See how narrow the connection between its body and its foot is?

Now see how little sugar I was able to get through the gap into the foot. If I had been pouring from pan with a little pour spout, I might have been able to guide the sugar in there better.
Today’s Project: Cast Sugar Fruit Bowl
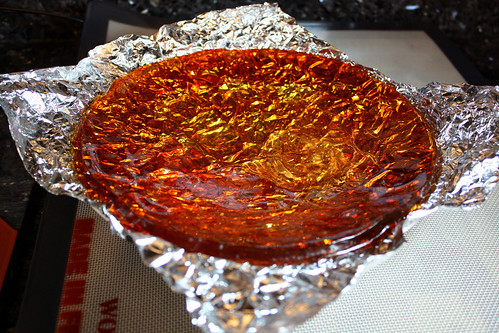
Aluminum foil is one of my favorite ways to give cast sugar some life and texture. Any pattern you give to the foil will form on the underside of the sugar. Make sure to use it shiny-side up for the best, smoothest patterns. If you oil the foil, it comes away easily once the sugar has cooled, but if the sugar is meant to be the base of a showpiece or something similar, you can also leave the foil on, reflecting even more light back through the sugar. This is a great technique for making blue-green marbled sugar look like water, as I did in my dolphin showpiece.
Cake rings–two or three inch bottomless metal rings used in professional bakeshops–are really useful for pouring perfectly round shapes, whether straight onto a Silpat or oiled marble, or onto oiled aluminum foil like I’m doing here. Unfortunately, I don’t own any cake rings myself (something I’ve wanted to fix for years), but I do have a nine-inch springform pan. I used it without it’s bottom, well-oiled both opened and closed in case some of the sugar leaked through at the place where the ring opens and closes, and turned upside down because the sides were straighter at the top than the bottom, where the base notches in. If you don’t have a springform pan, you can just pour a round shape free form and call it an artisan bowl.
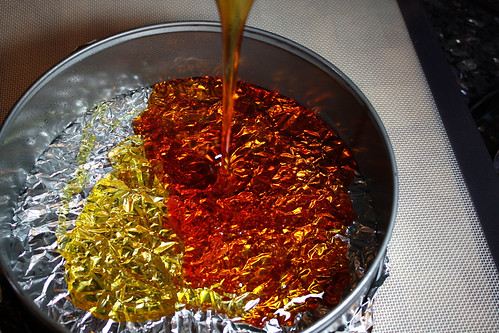
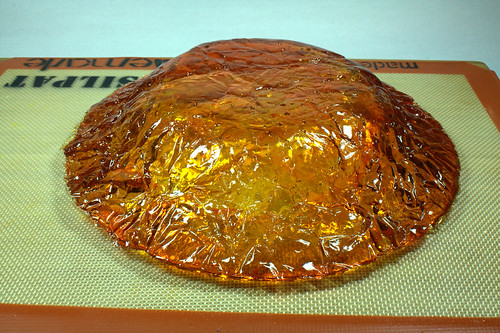
Before the sugar was done cooking, I had my aluminum foil crumpled, straightened out and brushed down thoroughly with oil, and my springform ring oiled, closed and pressed down into the foil, which I then folded up around the outside. I colored some of the sugar yellow and some red, then poured them both into the center of the ring and let the sugar spread out to the edges. Using two colors gives the sugar even more life and movement.
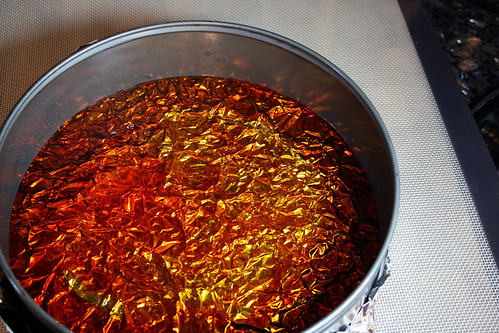
Next, I let the sugar cool until it held its shape, but I was still able to easily bend and form it.
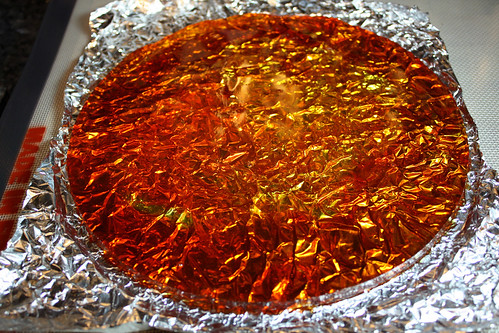
I released the springform pan and carefully pried it away from the edge of the sugar in the few places that were still trying to hold onto it, more from heat than from a lack of enough oil.
I took the shape, foil and all, and set it on top of a shallow soup bowl with a wide rim (you’ll be able to see it better a few photos down).
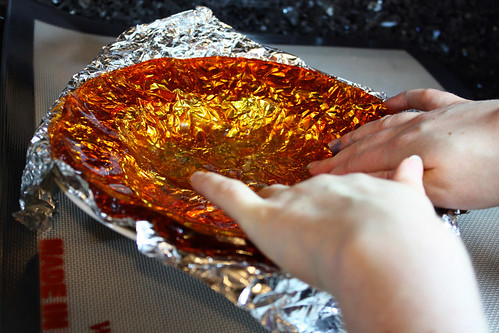
Then I used my fingers to press the center down into the shape of the bowl, being careful not to press too hard too fast or burn my fingers.
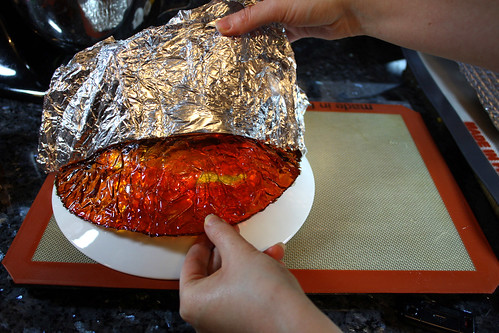
Once the sugar was more or less cool and holding its shape on its own, I turned the bowl upside down and set the sugar bowl upside down on top of it. Then I peeled back the foil slowly.
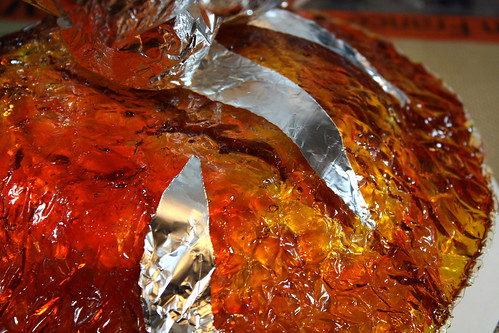
I was very careful to oil my foil well (I’ve neglected to do that well enough in the past), but I still had a few places where the foil stuck on the first pass.
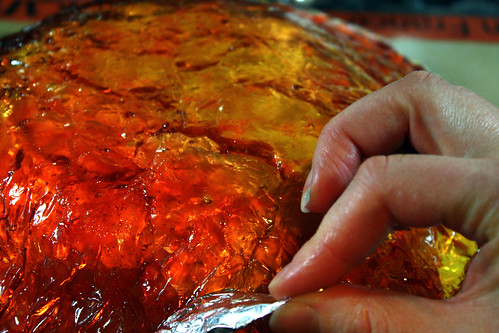
Fortunately, all of those little pieces came off easily for me. (It may have helped that my sugar wasn’t entirely cooled yet.) If yours don’t, you can try to get them off by chipping away at them with a paring knife.
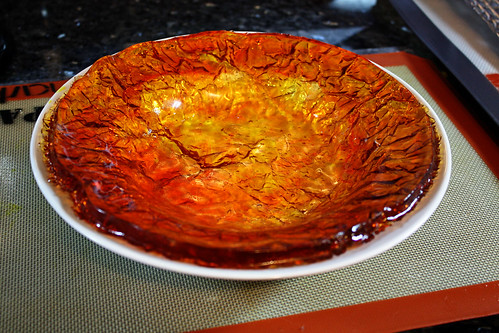
Because my sugar bowl was still a little warm, I turned it and the real bowl back right side up and let it cool supported until it got to room temperature.
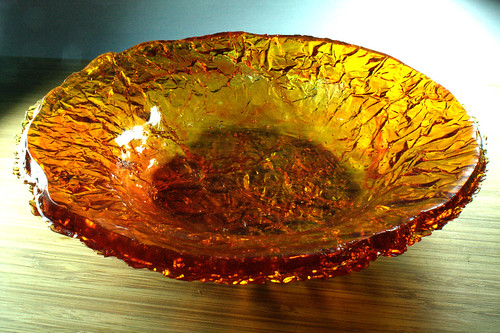
So, there you have it: a fully-functional serving bowl made entirely out of sugar. You just wouldn’t want to put anything wet in it. Unless, of course, you wanted to freak your guests out with a melting, dissolving bowl on the buffet table. In which case, send me photos!
Seriously, though, you don’t even have to stick to fruit bowls. You can make all sorts of cool serving bowls and plates and even cake pedestals from sugar. I’ll hopefully be showing you some other options along those lines in the near future.
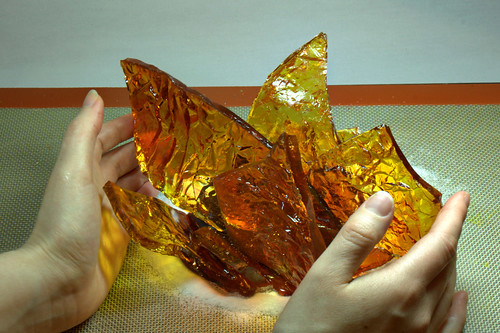
Here’s the bottom of the bowl, so you can see the texture–
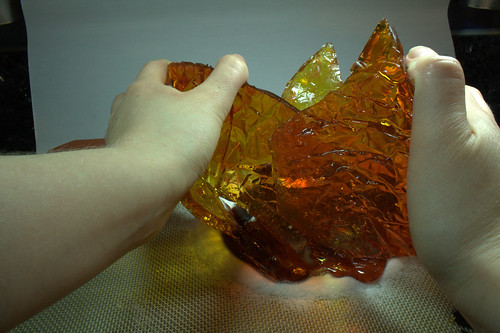
Wait…
What is that person doing???
Oh no, stop stop stop!!!!
Aaahhhh! Who on earth would do such a thing? I spent a couple hours making that bowl! And I was going to take more photos! And…
Huh, I think that’s my hand holding the murder weapon, actually.
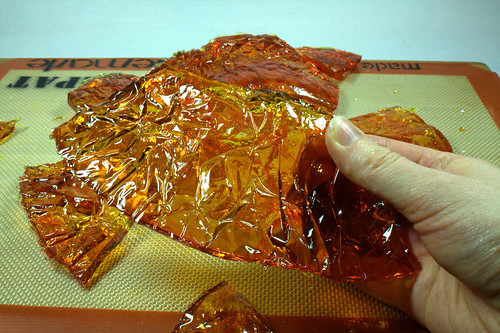
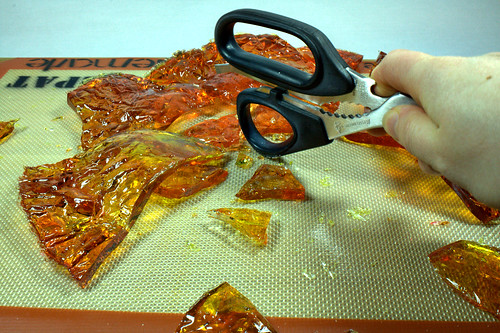
Why would I commit such a senseless act of violence against my beloved sugar bowl? Because this is actually another sugar technique, and I’ve sacrificed my little creation in the name of education. (You didn’t know you were going to get to learn even more today, did you?) In Sucre d’art, l’envers du décor (Sugarworks, Behind the Scenes) by Stéphane Glacier, it’s called Sparkling Sugar. The method is much the same as what we’ve just done, only you can let the sugar cool flat before breaking it. Once the sugar is totally cool, give it one good tap with something heavy like a sturdy pair of kitchen shears. Try to crack it in just one stroke to avoid shattering it into little unattractive bits. The sugar can then be used to give depth and dimension to showpieces, hiding supports or just filling out empty areas in the composition. You can hit the pieces with the flame of a blow torch to make them even more translucent and shiny.
But now that my bowl is gone, where am I going to keep those apples? I can’t just leave them on the counter or the cutting board. They’ve already experienced the opulence of living in a handmade sugar bowl!
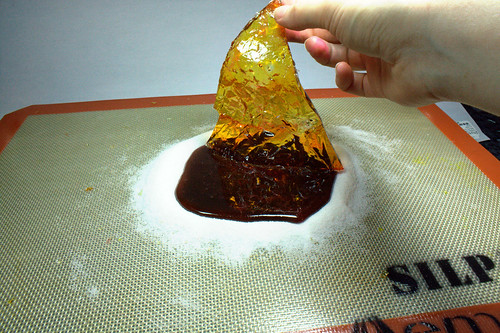
Well, maybe if I take some scraps and melt them down in a Pyrex measuring cup in the microwave…thirty seconds at a time until the sugar is pourable again…use some granulated sugar as a dam to keep the base thick, I can put this here…
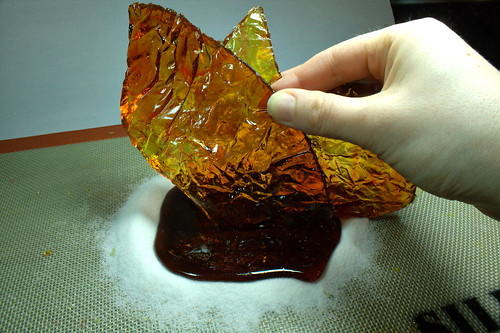
…and this here…
…and these here…
…and then hold everything in place until things cool down…
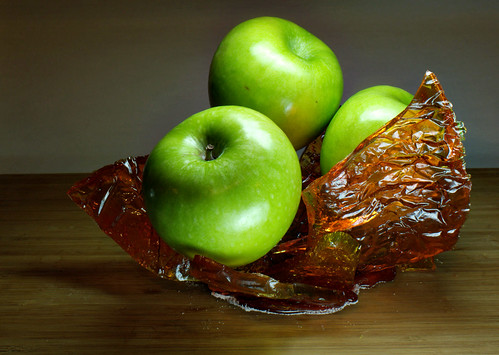
…and now my apples can have their very own “showpiece” to hang out on. Hey, it’s a more stylish address than the cutting board!
And that’s the final sugar lesson I want to leave you with for today: if you work with sugar, play with it. Things are going to go wrong. Pieces will break, shapes won’t turn out how you were imagining them, colors will mix into shades you never dreamed of. But the true art of it all is rolling with the punches. At each and every moment, think about what you can do with what you have, and if you’re creative about it, you might even like the end product than what you set out to make.
If you do try this out, take pictures and show me! I’d love to link to anything inspired by these lessons.
Other Sugar Work Posts at Pie of the Tiger:
Cadbury Creme Brul’egg
Sugar Work Equipment
Sugar Work (Pastry School Flashbacks)
Battlestar Galactica Cupcakes with Sugar Decorations

 Stumble Upon
  Del.icio.us
  Buzz
Buzz
That looks absolutely amazing!! When I saw the scissors.. I was like..NO!!
Steph’s latest blog post: TWD: Cup Custard…steamed!
Haha, good! Er, I mean…I’m sorry. Wait, no, I just can’t remorse off in this case…shattering sugar on purpose is pretty fun, if kinda evil.
Wow, it’s so beautiful! Amazing!
Julia’s latest blog post: Borscht
Thank you!!
But wait, how did you melt down the scraps? Just put it back in the pan and boil again?
Oh, good question! You can either do it on the stove or I actually just threw them in a Pyrex measuring cup and microwaved them for 30 seconds at a time until they were melted again, shaking the sugar each time I checked on them to mix the different-colored scraps together and try to get the different-sized pieces to melt at the same rate. Because the sugar’s all already cooked, you don’t have to cook it all the way back to 315 degrees again; you just have to get it liquid and pourable.
This is a great tutorial for those of us that might dabble a little but have no formal training in this work. Thanks for doing it. Where is a good source for glucose btw?
Michael Natkin’s latest blog post: Best Vegetarian Chili Recipe – Delicious, Easy, Healthy and (Optionally) Vegan
I’m not really sure, to tell the truth. All the suppliers I was familiar with in the past sell to restaurants/culinary schools, etc., not washed up pastry cooks playing around in their kitchens. I bought my current supply at Home Cake Decorating Supply up in Northgate, so that’s a good place to go in a pinch. I’m looking at ordering some from either L’Epicerie or Chef Rubber since Chris and I already have orders in mind for both websites, but there might be a cheaper/better source that I haven’t run into yet.
I did run into a recommendation from my chef for Patisfrance glucose in my notes yesterday, though. He said it was cleaner/purer/better, which is important with sugar.
I would like to take a week or two mini-course somewhere close to central Arkansas or Alabama on poured sugar and chocolate poured art. Know of any?
Unfortunately I don’t–sorry! The closest thing I’ve heard about is the Notter School of Pastry Arts in Florida, but obviously that’s quite a bit further afield. You might try calling a culinary school with a pastry program in your area; they may be able point you in the right direction.
I love the idea of using foil to texture the sugar.This is beautiful!
Kate’s latest blog post: mysqlerror
Thanks! I really enjoy the look the foil gives it…it seems like it should be much harder to achieve.
Love, love, love the swirled sugar bowl. And we’re so happy to have this tutorial! My boyf and I had some disastrous results w/amateur sugar work (humidity, BAD!) but it turned out okay in the end, and my coworkers were impressed by my baking competition submission. I’m sure he’ll want to give it another go after I show him your blog. 🙂
E.Lee’s latest blog post: Homemade Maraschino Cherries
Oh great! I’m glad to be able to help you out! Humidity is a big, big problem. Especially in my kitchen, for some reason. I’d blame it on living in Seattle, but every time I did sugar work at pastry school, everything turned out perfectly bone dry!
Do you have pictures of your baking competition submission online?
Thank you for this tutorial! The bowl looks really amazing and totally not so simple. Now all i have to do is find some glucose … i guess honey or corn syrup couldn’t work here, right? Was that a totally ignorant question (i have no idea what the characteristics of glucose are)? 🙂
Nope, not an ignorant question! Honey, as much as I love the stuff, would have too many other “impurities” in it, from the perspective of sugar work, but corn syrup might do okay. Glucose and corn syrup (and honey, for that matter) both act as invert sugars, which means that they help the sugar resist returning to crystalline form. Corn syrup has glucose in it, but it also has other ingredients (especially the commonly available high-fructose stuff) and more water. If you want to try the recipe with corn syrup, I’d lower the amount of water in the formula a little and see how it does. If you can get your hands on corn syrup without high fructose corn syrup added into it, my guess is that would work better. I’ve been able to get Karo’s “original” corn syrup lately at Whole Foods and another local supermarket for the last few months, so it might not be as hard to find as it used to be.
Also, I’ll be doing a sugar recipe soon that doesn’t include glucose, so if the light corn syrup doesn’t work, this one probably will.
Good luck! Let me know how it goes.
That is so crazy. I’ve cooked sugar to candy but this takes it to a level I never would have thought of. Thanks for sharing.
Thanks. 🙂 It’s no harder than making sugar candy…try it sometime!
This is AMAZING! It looks like a glass bowl!
Thanks!
I’m in awe. I don’t think I’ve ever attempted anything involving hot liquid sugar. I’ll be back here if I ever feel the urge to try!
I hope you do sometime…it’s a lot of fun!
How does it taste? 🙂 (I’ve never understood “show towels” either)
The last batch I made tasted just like cotton candy! A lot of the time, though, it just tastes like hard candy without any flavoring.
Was wondering, do you know if I could place a cast sugar decoration on top of a cake iced with buttercream? I just am not sure if it would melt from the fat content in the icing.
If you scroll down this page, there’s a photo of a cake I did iced with Swiss meringue buttercream and topped with a blown sugar decoration. As I remember, it didn’t dissolve at all, although I may not have left it on overnight…it’s been too long to remember. Cast sugar would be even hardier because it tends to be thicker than blown sugar. I don’t think the fat can melt it, and I think the water content is low enough in fat-based icings that you’d have to leave the cake sitting around for an awful long time before it would become a problem.
hello, where can i get glucose? is it corn syrup? thank-you
While there’s some glucose in corn syrup and they look somewhat similar, glucose is a pure product while corn syrup is a combination of things. You can usually get glucose pretty easily at any craft store that sells Wilton cake decorating products (or buy their glucose on Amazon.com. I’ve been buying mine at a local cake decorating supply store–it’s cheaper, and I like to support locally-owned places. If you ever want some in a larger quantity, there are several websites that sell professional-sized tubs marketed to professional chefs.
I am wondering I saw on the Cake challenge on TLC a lady poured sugar and water into a muffin tin to make beautiful circles that look like water. I have looked for a long time for a recipe for this and how long to boil the sugar and water and to what temperature.
Thanks!
The recipe in this post should work for you, I think, although I’m not so sure how the water part works. Generally, you want to avoid contact between your sugar and humidity of any sort, although I do know a technique where you pour the sugar over ice and then dry it out in an air tight container with something to absorb the humidity from the air (there are a few different things you can use).
I’m curious about this, so I’ll try to find out more about the technique and let you know if I find anything.
hi at my college prep arts school we have to put a food and make a business out of it. my group is doing sugar casting and pulling. Is it possible to add extracts and flavorings to them? because we would like to make cute sculptures that also taste like something besides sugar.
I’m so sorry that this answer is probably too late to help you, but in case it isn’t, you can definitely add extracts to the sugar to flavor it. Alcohol-based flavorings work the best, I believe, because the alcohol evaporates off completely. Sometimes the sugar actually tastes like cotton candy all on its own to me, which is nice, though I’m not sure why it does some times and not others. I hope your project went well if it’s already over! Sorry again.
Hi!
i was wondering if you have any tips for me. i am 13 and i want to start in the world of sugar, but my mother won’t allow me to do it unsupervised. she says sugar work can burn you. is that true? also what would happen if i were to add some fruit to the concaction? please please let me know asap! thanks! 🙂
Hi Kate!
Your mother is right that you shouldn’t do the sugar work unsupervised. It’s *very* hot, and you can burn yourself just pulling the hot pulled sugar, or being splattered with the sugar while it’s still melted, or handling the blow torch or alcohol lamp that’s used to attach pieces together. I don’t even like to do it when I’m home alone now that I’m pregnant, just because you can get overheated and dehydrated standing in front of the heat lamp and handling all of that sugar–time flies when you’re having fun!
However, if she won’t let you do it unsupervised, it sounds like she *will* let you do it supervised. I hope that’s the case, because I think it would be fun for the two of you to play with sugar together! It’s a great way to learn a little science, too, if you need help convincing her further. 😉 The cast sugar technique would be a great place to start. You can pour it into all sorts of things: any silicone molds or bakeware that is oven safe is safe to pour sugar into, and you can also use things like metal cookie cutters that have been sprayed with oil spray, placed on top of a silicone baking mat or some greased foil. Another fun thing you could do with that would be to make stained glass cookies. People usually make them by cutting holes in cutout cookies before they bake them and filling them with crumbled hard candies, but you could also bake the cookies ahead of time and fill them carefully with your own sugar. There are also special molds you can buy for making lollipops.
As for the fruit, the one thing you really have to be careful about with sugar is to avoid moisture at all costs. Wetness dissolves the sugar, so even humid air can make it sticky. So, fresh fruit would be out. However, if you wanted to add dried fruit, I think that would work pretty well as long as it wasn’t too oily.
I hope that helps! Let me know how it goes, and feel free to ask me any other questions you might have.
– Jessica
I’m looking forward to trying this over the holidays. Your directions are great.
The past couple of years I’ve made “stain glass windows” with gingerbread. I printed out some windows I found on-line, cut out the “panes” of the paper window and used it as a stencil over raw ginger bread that I had rolled out to 8.5″ x 11″. I baked each sheet of gingerbread, then, while it was still hot I sprinkled the selected color of broken Jolly Ranchers candy into each “pane” and stuck-it back in the oven for between 3-5 minutes. I have a poor oven, and need to crank it up to get the candy to melt. If the design for each of four panes is in the same orientation (ie portrait or landscape), you can glue the edges together in the shape of a “W” with royal icing. Then put it on a surface like an extra bookshelf and place a candle behind each pane.
I use either parchmant paper or a silicone baking mat to prevent sticking. Also, I recommend doing one window at a time and testing the baking process with a scrap of gingerbread dough and the candy, before embarking on the whole activity. Kids can help with color selection and smashing candy (in the garage, double bagged, adult supervised, etc.) Jessica, feel free to edit or delete this if it’s too long.
No worries, it’s not too long at all! I’ve been wanting to do that project for years (I think my mom and I did stained glass cookies when I was a kid, but I don’t think we ever made the candle holder kind), so it’s good to get some tips! It would be interesting to try it the normal way and with cooked sugar at the same time and compare…ah well, maybe next year when I won’t have a newborn to take care of. 🙂 I’ll be happy just to get some Christmas cookies made at all.
hey just wondering if you know where i can get the book by stephane glacier from? im from australia really into sugar work but i just dont have anyone to teach me. I just done your sugar bowl and messed around with some colours! I really get what you mean about the cooking of the sugar! i tried your idea of covereing the pan and it worked really well! i’ve done a few pulled pieces that turned out well but i have all these ideas for showpieces but my skills just aren’t at that level yet!! look forward to ur next post!
You know, I can’t remember where I got the book from myself. Some online pastry supplies website or something. Hopefully somewhere will ship it to Australia!
It sounds like you’re doing well with the sugar! I’m glad you enjoyed the post. I’m hoping to get some more posts done in the next few months. We have a four month old son keeping us busy right now, though, so I can’t say exactly when that will be!
I am trying to make a sugar mold of my face for an art project. I poured the sugar syrup mixture into a plaster mold, but i’ve run into two problems: there are a lot of air bubble on the top surface of the poured mold, and it seems difficult to get the sugar cast out of the mold without either breaking the cast or the the plaster mold. Any insight? I could really use some help!
1) When the sugar is still melted, you can run the low flame of a blow torch lightly over the bubbles on the surface. They should expand, rise to the surface and pop. But it sounds like your sugar is already set. You can try the blow torch, anyway. If the bubbles aren’t very deep, you can melt away the sugar around them and get a smooth surface. Or you could get a sheet pan very hot in the oven and rub that surface of the sugar against it to even things out. I would wait to do either until you get the sugar out of the mold.
2) Hmm…I’ve never done a plaster mold, so I’m not sure how to get the sugar out if the mold wasn’t lubed up with oil or something really well to start with. My impulse would be to break the mold and chip away what’s left! Otherwise, heat is generally the answer with sugar. If you could get the sugar to melt a bit where it’s touching the plaster, either using hot water or a hot oven or something, you might be able to slip it out. I’d try something as soon as possible; the longer it’s been since the sugar has cooled, the more brittle the sugar becomes.
I wish I had better answers for you, but I hope that helps a little. Good luck!
thanks so much for the suggestions i really appreciate it.
When will you continue your sugar work blog? I’m ready for more lessons!
Really soon, I hope! Our son is almost 5 months old now, and I’m hoping that in the next month or two we can arrange it so we can do some sugar sessions and get the photos for the posts. Also, I have a new laptop coming sometime in the next week, which will hopefully help me get a little more time to work on the blog.
Thanks for letting me know you’re interested in more…it really helps motivate me to do all the work involved with photographing the sugar work (which is a lot harder than photographing cupcakes!) knowing that it will be appreciated! 🙂
Ooh! Love it! I’m so glad someone is posting about this! I sadly, don’t have the $200-$400 to shell out for proper books on the techniques. Will you be doing any posts on pulled sugar techniques?
Yes, I’ll definitely be doing pulled (and blown) sugar posts!
I know you are busy with a 5 month old, but whenever you can….I know there are tons of us out here waiting for your new postings! You’re great! Thank You! You wouldn’t have any ideas as how to make a giant poured sugar “splash” of water from a golf ball, would you? I want an exagerated splash! I tried it with foil, but the foil, of course, was too limp to hold the sugar. Any thoughts would be greatly appreciated.
Haha, I’m working on it! Believe me, it’s on my mind every day.
Poured sugar splash…I have a couple of ideas…when do you need to have it done by?
Wow! That was quick! Thank you so much! I really don’t need it until June. I want it to be part of a cake I am going to try to do in June, but I was going to practice on a dummy cake to see if I could get it right. I have never poured sugar before, and your post gave me some confidence…so, last night I tried it. At least I know what won’t work! LOL After I cleaned everything up, I came back in and read your blog, again. Wish I hadn’t thrown out my sugar. That is a great tip to remelt the sugar. Once again, Thank you so much for your quick reply. I’m glad to see that you have sugar on your mind! LOL
Sometimes I can’t get to the computer at all, but sometimes I’m stuck under a napping cutie on the couch with my laptop and have nothing better to do than be quick. 😉
Oh good–since you have a little time, I’ll see if I can get a tutorial done on it in the next two weeks. That way if I don’t get a chance to do it, there will still be time for me to explain it. How big will the golf ball be? And will the splash be going upward, like it’s hitting a water hazard?
I saw a swiss chef make a confection candy once.He had a hand tool that he dipped into a confection at the correct temperature and the tool looked like it had a hundred nail on it ,the part that was dipped.Then he swung the tool hard and strings of candy swung off the hand tool.DO YOU KNOW WHAT I’M TALKING ABOUT ?
It’s called spun sugar. You can also use a whisk with the curved ends cut off in place of the specialized tool.
Thanks for your post it was very informative. This is the first time I will be working doing sugar art and I was looking at doing an Eagle to put on top of a cake. Any ideas on how to do an Eagle and is there any websites out there that you know of where you can get an Eagle mold. Also can you paint the sugar after it dries to add more details? Thanks
Not sure on the eagle mold, but I do know you can paint the sugar after it dries. The best way to do it is dry food safe pigment and alcohol (Grand Marnier works well) so that it evaporates quickly, but I’ve used the liqueur and paste food coloring and it worked all right.
Wow, thanks for the comprehensive instructions. I am interested in using casted sugar to enhance my gingerbread houses this year. You have provided me with the tools to get started. Looks like fun!
Great! I’m glad to help!
I just wanted to say how much I appreciate your post on sugar work. There isn’t much info on this topic. I tried your recipe with glucose and another recipe without and another recipe with a mixture based on isomalt and every time its a disaster!!!! It looks great in the beginning and than after 3-4 hours when the sugar is no longer warm it begins to sweat, it starts to melt!!! I live in Holland so I comfort myself with the idea of humidity, but all the time, every time?????? Do you maybe know if there is a different explanation, because I think I did everything according to the rules, melting the mixture to 315F and all. Btw I have gas stove so maybe that the sugar got to the desired temperature before the whole water evaporated?! Please help if you can!
That sounds like humidity to me. The sugar reaching the temperature is dependent on the water boiling off, so there’s no way it could have boiled off too little water. And a gas stove is ideal…you want to cook the sugar quickly. I think my teacher said 30 minutes for a batch this size is ideal.) Living in Seattle, we have a lot of trouble with humidity and sugar work.
Air conditioning is a huge help in this situation. My sugar work at pastry school was always bone dry days later and the only thing I could figure was that the building must have been dried out from air conditioning. The other thing to do is to put the pieces immediately into a closed, air-tight container with a desiccant/dehumidifying agent (like these: http://www.shopchefrubber.com/home.php?cat=1553).
Good luck! I hope that helps a bit, and I’m glad my post has been helpful to you! I’d really like to do more posts, but it’s been hard finding time with a baby to take care of. 😉
I had been trying to get the recipe right, and as soon as i did, the first thing i made was this bowl!! it turned out pretty awesome for my first attempt!! thanks for the step by step article!! loved it! and if you post anything else on other things to make, i will definately visit and give it a shot!! thanks again 😀
Why glucose? Why not corn syrup?
Glucose is much purer than corn syrup. All of the impurities in corn syrup affect the quality of the resulting sugar.
This is awesome work! I was wondering, I would like to make windows for my gingerbread house, one above the door and the sides of the house. I don;t really know where to start though!
Thanks!
Thanks! 🙂 You know, I was thinking about doing a post on that topic this week, but I don’t know if I’ll get to it or not, so I won’t make any promises! Instead I’ll try to tell how to do it quickly…
The easy way to do gingerbread house windows is to use crushed up hard candies and melt them in the window holes in the oven…I’d give directions, but I haven’t done it since I was a kid and it should be easy to Google for that. Otherwise, you could use the recipe on this page (cut it in half or a third) and sort of do the same thing I did with the copper cookie cutters above. Just make sure to put the gingerbread walls on a Silpat or oiled aluminium foil on a cookie sheet before you pour. A Pyrex measuring cup is a good thing to put the sugar into to have more control when you pour in a small area.
Hope that helps!
Ok, sounds good. So lets say… I make the gingerbread piece, cut wholes for the window.. it gets bigger, cut it out to the right size of my template including the window again.. then put the beat up candy in the window and put it back in the oven until its hard correct? I got this website, if you don’t mind verifying. I was thinking like Jolly ranchers for the top and clear candy for the windows? I was thinking like a lodge.
P.S. When its done I will send you a photo of my gingerbread house!
http://wisdomofthemoon.blogspot.com/2008/02/breaking-hard-candy.html
hi, i make candy on mackinac island mi. fudge,brittle & dipping chocolate would like to add a lot of new candy . maybe like blowen sugar . hope to learn . thanks,tienne
how many cups (roughly) would you say that you used of the glucose?
Very roughly, it’s not a huge amount. It’s been so long since I’ve made the sugar, though, that I can’t visualize it. I think any way you’ll be able to purchase the glucose, it will tell you what the weight of the container is, and you should be able to guesstimate how much volume you’d need that way.
You say at the begining that you are going to post a recipe for the sugar glass without glucose, where do I go to find that?
Hmm…well, it’s somewhere in my pastry school notes, over on the bookshelf with my cookbooks, so that’s the where….
In other words, I haven’t had time yet to post it. Sorry! I keep hoping to get a chance to come back to the blog and do more sugar work posts. Unfortunately, molten sugar and a very active toddler don’t mix so well.
Hi, thanks for a great recipe and easy to understand instructions. I am making my sisters wedding cake and hoping to add a sugar sculpture to the top, I was just wondering how long before the wedding could I make it? And how should I store/transport it if it is too big for a sealed container? Also the wedding is outside, what effects do you think this would have, and should I maybe just come up with another idea? Thanks, Nicole
If you want to make it ahead of time and transport it, I think your best bet is to make and store the individual components and store them separately, using some sort of dehumidifying aid to try to prevent stickiness, then assemble at the wedding site. One issue with that is that the longer the sugar pieces have been cooled, the more likely they are to break when you assemble them, so make sure you have more than one of any key component. You might try putting it in a storage tub with a lid, to seal it…you could try using packing tape around the lid to make it more or less airtight.
The longest ahead I’ve ever made anything is about a week. That sugar was nice and dry, and I had it stored with some limestone, so I think it would’ve survived longer. Generally, though, I’d make it as close to the day of as possible.
As far as the outside wedding, it should be okay for an afternoon. If it’s raining, that may be a problem, and you wouldn’t want it in direct sunlight…though, you wouldn’t want the cake there, either!
Also, I’d suggest practicing ahead of time and trouble-shooting that way. That way you’ll know how your sugar is turning out, and how long it will store for, etc.
Good luck! Let me know if you have more questions…I’m sometimes slow to respond, given that my only time online right now when my 16 month old is asleep, but when I can I’m happy to help.
Not sure if you’re ever going to find this because this post is so old, but I just made it and it’s still in the mold.. how long should it take to dry to the point of being able to take it out of the mold? It’s been like 3 hours already! I can’t find the answer anywhere on the internet so this is my last hope!
The sugar doesn’t dry, it hardens as it cools. Unless you were molding something huge and solid, it should have long since been cold and hard at 3 hours. My guess is that it didn’t cook to a hot enough temperature.
Thanks for your step by step expalnation, you are great, I’d like to ask you if we can use the same recipe for pulling sugar? and if you kindly tell us how to make tree from this recipe? I’m Canadian, but I live in Kuwait, and we don’t have hear molds for making tree, so please can you tell me how to make a real tree from this sugar? I’ll be appreciated your prompt reply. Thanks and regards
I wanted to say thanks for the tutorial, it was a great beginner. I see you keep mentioning pastry school, just out of curiosity where did you attend school?
I live at 4500 feet (approximately) in altitude. I know that changes the temperature for boiling. Do you know how that would affect this recipe?
You mention making a cake pedestal…is cast sugar really strong enough to support the weight of a cake? I’m a cake artist and I’m making a cake that “requires” (I could do it without, but where’s the fun in that?) a clear bowl shape under the main part of the cake. Obviously, I’d have to cast it with a flat bottom, but I’m worried about the weight of the cake above it. Thanks!
WOW! I stumbled upon your blog as I googled blown sugar fruits and I’m amazed at your sugar work! Such talent and artistry =D May I ask which Pastry School you attended?
Hi there, i just make sugar showpiece yesterday and after i finifh shape it i let it cool and after few minutes it should be harden and set but when i touch it it kinda stick to my finger and theres kinda oily and watery…is it starting to melt??why this happening?
Hi, I am making the beer bottles out of sugar and using a silicone mold. When I remove it from the mold however, the sugar bottle is very sticky. Do you know how I can prevent this?
Do you think a sugar dome would hold up in this situation, or would there be too much moisture?
I want to put a cupcake under a sugar dome, then put that under a doll cake.
My daughter is expecting her first child and this cake will be like a “bun in the oven.”
Any advice?
Hi, I am attempting to make sugar bottles and they are always sticky. Can you tell me why and wht I can do about it. Thanks
This is amazing! I was talking about this process in my blog (adeliciousfoodblog.blogspot.com) for making gingerbread house windows, but I added a link to your blog because of your beautifully photographed instructions. The bowl is such a great idea too!
I know you did this two years ago…….I tried to do the sugar this weekend, and had two back-to-back failures. My sugar kept on caramelizing. What am I missing? It’s normally around the 150 – 160 degree mark that it does that. I tried only with 100g of sugar……?
You must have your thermometer set to Celsius instead of Fahrenheit. Sugar caramelizes at 160°C, which is equivalent to 320°F.